The new Ghost editor features in Ghost CMS
Ghost CMS has released a new version of its editor with a number of new features, including a new block editor, improved collaboration tools, native image editing, post history, and landing page cards.
The new Ghost editor is a complete rewrite of the Ghost editor, released in October 2024. It is built on React and Redux, which makes it fast and responsive. It uses a new Markdown rendering engine, which is more accurate and consistent. It has a new toolbar that is more customizable and efficient.
It supports a wider range of media types, including images, videos, and audio. And it has a number of new features for writers, such as focus mode, distraction-free writing, and word count goals.
Overall, the new Ghost editor is a significant improvement over the previous editor. If you are a Ghost user, I highly recommend checking out this post.
In this blog post, we'll take a look at some of the key features of the new Ghost editor and how they can benefit you.
It is faster, more robust, and packed with new features that make it easier than ever to create and publish beautiful content.
The latest updates in Ghost CMS have enhanced the editor experience, including features like emoji autocomplete. Learn more about these refreshed settings in Ghost CMS and how they improve user workflow.
You will Learn From this Blog:
- Introduction
- Native image editing
- Post History
- Landing page cards
- Bookmarking
- Other improvements
- How to try the new Ghost editor
- Summary of the blog
Here is a more detailed look at some of the new features including in the Ghost editor:
Native image editing
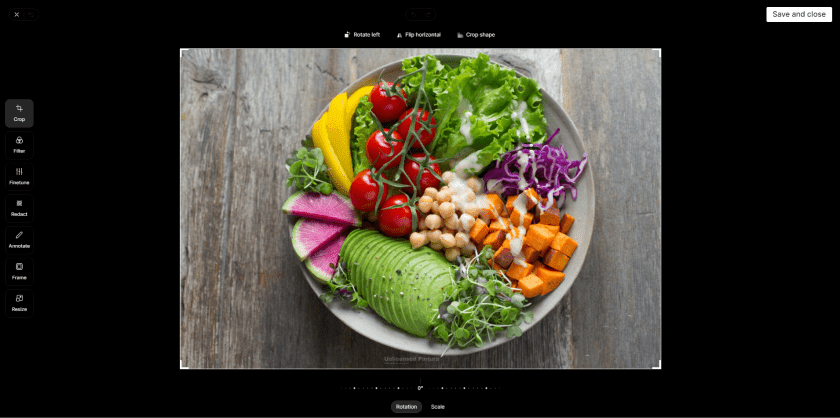
One of the most exciting new features of the Ghost editor is native image editing. This means that you can now edit your images directly in the editor, without having to leave to use a separate image editing program.
This is a huge time-saver, and it also makes it easier to create visually appealing content. With native image editing, you can:
- Crop and resize images
- Apply filters and effects
- Adjust brightness, contrast, and saturation
- Add text and annotations
- And more!
Post History
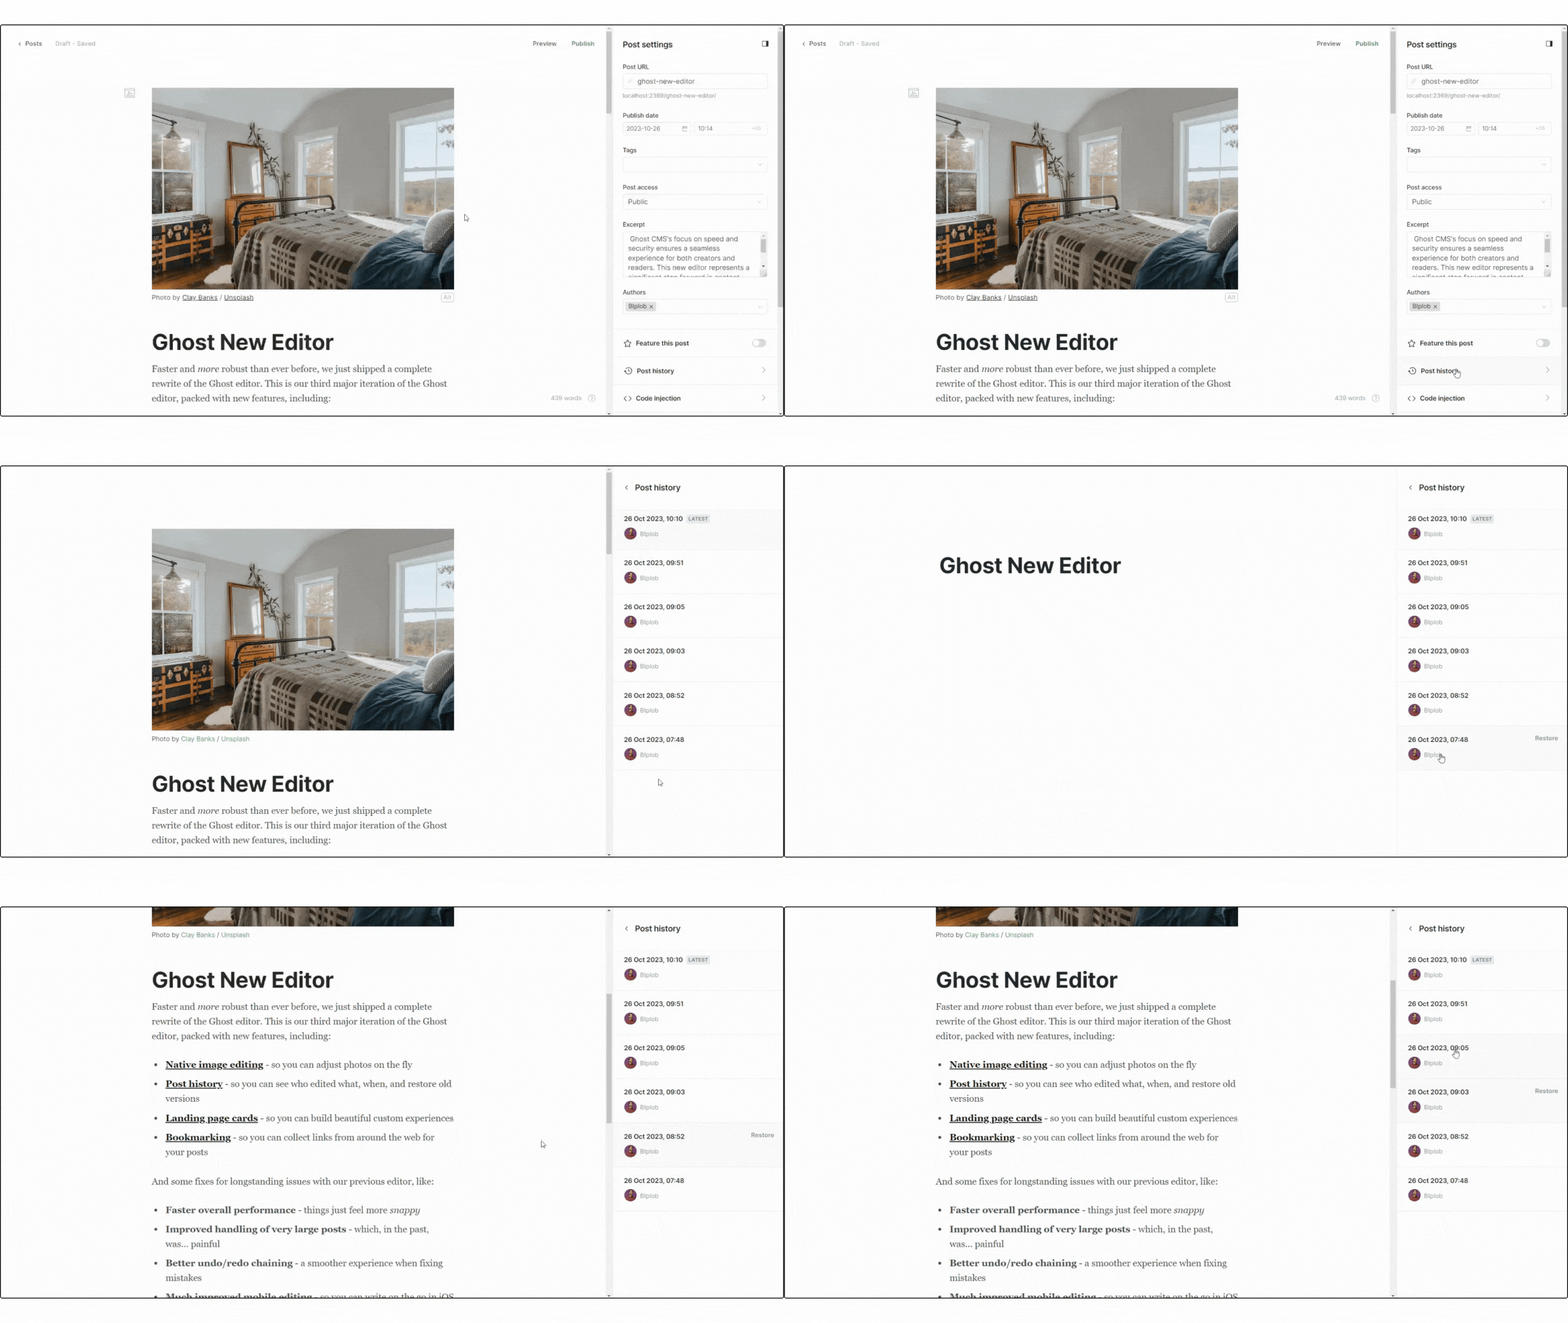
Another great new feature of the Ghost editor is post history. This allows you to see who edited what, and when, and restore old versions of posts.
This is incredibly useful for collaboration and revision control. If you're working on a post with a team, you can easily see what changes have been made and who made them.
And if you make a mistake, you can simply restore the post to a previous version.
Landing page cards
Landing page cards are a new way to create beautiful custom landing pages for your posts.
With landing page cards, you can add images, videos, text, and other elements to create a unique and engaging experience for your visitors.
Landing page cards are perfect for promotional pages, product pages, and other types of pages where you want to have full control over the design and layout.
Bookmarking
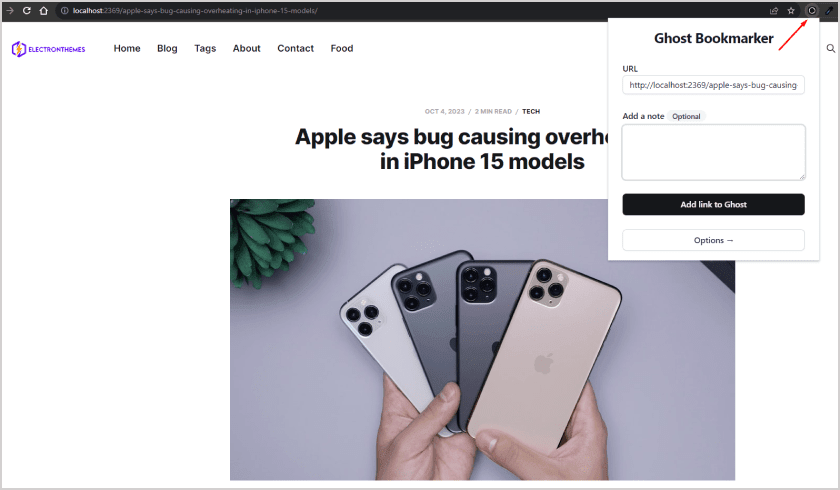
The new Ghost editor also includes a new bookmarking feature. This allows you to collect links from around the web for your posts.
This is a great way to keep track of research materials and other resources that you want to use in your writing.
When you're ready to add a link to your post, you can simply select it from your bookmarks list.
Other improvements
In addition to the new features listed above, the new Ghost editor also includes a number of other improvements, such as:
- A more intuitive and user-friendly interface
- Better performance and stability
- New keyboard shortcuts
- Support for more Markdown features
- Improved accessibility
- Better undo/redo chaining - a smoother experience when fixing mistakes
- Much improved mobile editing - so you can write on the go in iOS / Android
- Nested lists - for structuring your bulleted thoughts
- Which wasn't possible before
- But is now
Overall, the new Ghost editor is a significant improvement over the previous editor. It is faster, more powerful, and more user-friendly.
If you are a Ghost user, I highly recommend checking it out.
How to try the new Ghost editor
To try the new Ghost editor, simply log into your Ghost site and navigate to the editor.
If you are on a self-hosted install, you will need to update to the latest version of Ghost to get access to the new editor.
Once you are in the editor, you will see a new toolbar at the top of the page. This toolbar contains all of the new features and improvements that have been added to the editor.
Summary
In summary, the introduction of the new Ghost editor in Ghost CMS is a game-changer for content creators. With its user-friendly interface, real-time preview, and customization options, it simplifies content production and enhances the overall user experience.
Ghost CMS's focus on speed and security ensures a seamless experience for both creators and readers. This new editor represents a significant step forward in content management and is a valuable tool for anyone looking to streamline and elevate their content creation process.
FAQs
Do you have more questions about the new Ghost editor features in Ghost CMS? We have answers to some frequently asked questions on the topic.
What are the benefits of using the new Ghost editor?
The new Ghost editor is faster, more robust, and more user-friendly than the previous editor. It also has a number of new features that make it easier to create and publish beautiful content.
How do I use the post-history feature?
To use the post history feature, click on the post settings menu and select "Post History". You will then be able to see a list of all the changes made to the post, and you can view and restore previous versions of the post.
How do I create landing pages with custom cards?
To create landing pages with custom cards, simply click on the "+" button in the editor and select the type of card you want to add. You can then add content to the card, such as text, images, and videos.

