How to Customize Portal settings in Ghost CMS
Learn how to customize the Portal settings in Ghost CMS to tailor the member experience to your brand and needs. Discover how to modify the signup options, look and feel, account page settings, and Portal links.
Building a successful ghost membership website starts with leveraging tools like Ghost CMS’s Portal. This feature empowers you to create a seamless subscription experience, making it easy for members to access exclusive content and support your work.
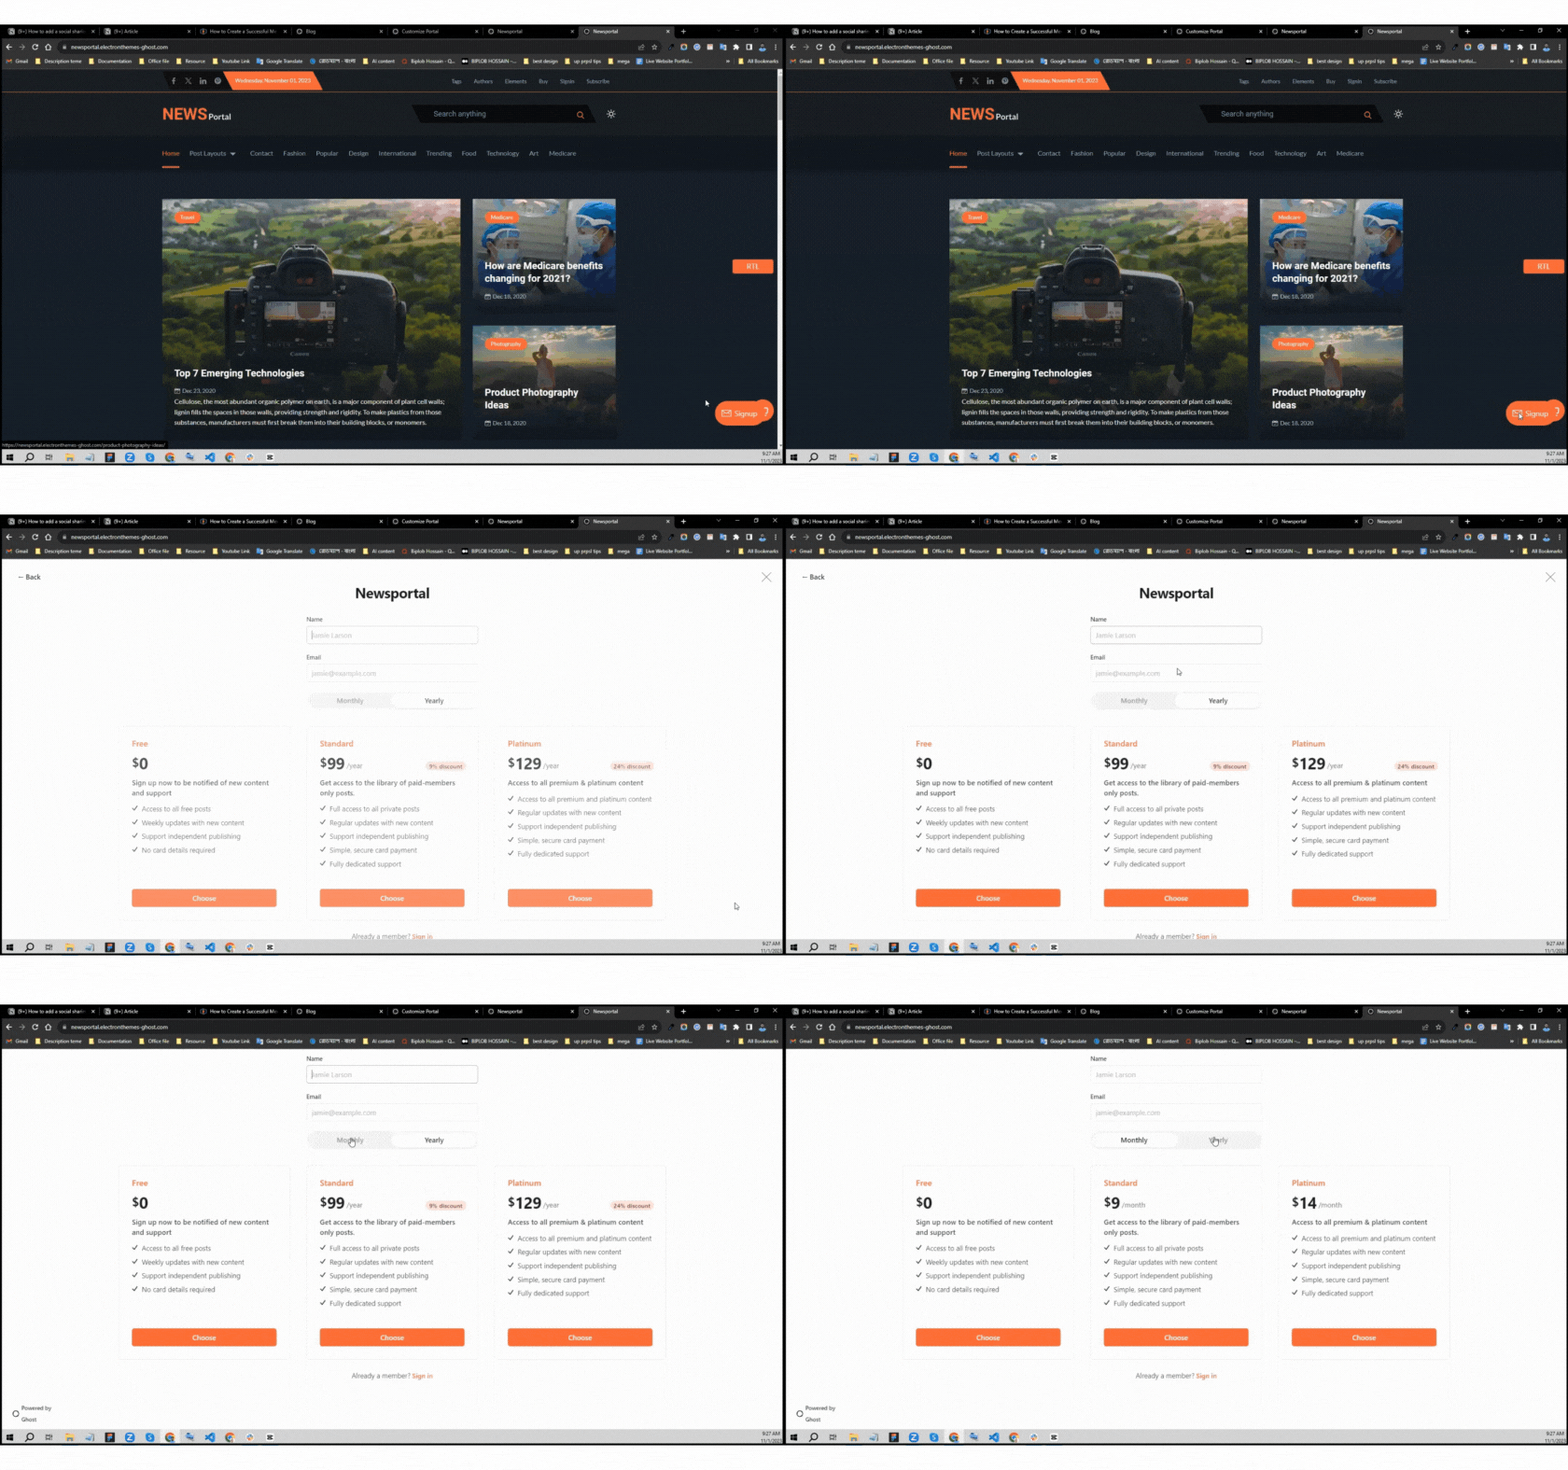
The Portal simplifies the membership experience for your subscribers and can be added to any Ghost site, using any theme, without writing any code.
The Ghost CMS Portal is a great way to provide members of your website with exclusive content and features. However, the default Portal settings may not be ideal for your needs.
Ghost CMS allows you to customize the Portal to match your website's branding and to provide the best possible experience for your members.
In this blog post, we will show you how to customize the Portal settings from your Ghost CMS dashboard.
What are portal settings in Ghost CMS and why do I use them?
The Portal settings in Ghost CMS allow you to customize the look and feel of your membership portal, as well as the signup options and account page settings. You can use these settings to create a portal that is tailored to your brand and the needs of your members.
Here are some of the things you can customize with the Portal settings:
- Signup options: Choose which membership plans are available to visitors who want to sign up.
- Look and feel: Customize the colors, fonts, and overall look of your portal to match your brand.
- Account page settings: Choose which fields are displayed on the account page and what information members can edit.
- Portal links: Generate custom links to specific pages in your portal, such as the login page, signup page, or account page.
How to Customize Portal Settings
To customize the Portal settings in your Ghost CMS dashboard, follow these steps:
- Log in to your Ghost CMS dashboard.
- Click on the
Settings > Membershiptab. - Under Portal Settings, click on the Customize Portal Button.
- You will see a list of options that you can customize.
- Sign-up options
- Look & feel
- Account page settings
Signup options
You can select plans, which are available for your visitor to sign up. You can also use any combination of tiers that suit your business.

- Display name in signup form: You can Show or Hide the Name input field from your signup form using this toggle button that allows your members to enter their names and attach them to their accounts.
- Tiers available at signup: From this section, you can customize your tier which is available for signup. To enable payment options in your portal, you must first connect your Stripe account then you can customize your portal settings allowing you to showcase your paid tiers effectively, ensuring potential members understand their benefits.
- Stripe integration: Discover how to work Stripe integration for Ghost portal settings on Ghost CMS for a seamless process and now you will show the free signup option. When you are connected to Stripe and now you can add the premium Tiers which you want to offer your visitors, then you can select the Tiers and prices available at signup as well.
- Display notice at signup: In this field, you can include custom text and links as policies that should be displayed at the time of signup.
- Require agreement: In order to become a member of your publication, members must agree to your terms of service (via checkbox).
Look and feel
Design a Portal that reflects your company's brand or style of publication. When you change your portal design you will see real-time updates on your screen. Don’t forget to save your changes after editing.
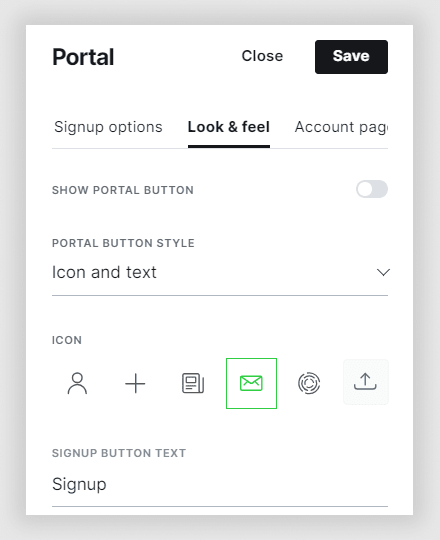
- Show Portal button: You can control your Portal button using this toggle button. You can show or hide your portal button via this button.
- Portal button style: You can choose your button style from Icon and text, Icon only, or Text only.
- Icon: If you want to add a button icon to improve style, this option is available for it. You can choose from a library of icons or you can upload a custom icon. It's recommended to use an SVG, PNG, or JPG image no larger than 60px by 60px.
- Signup button text: This option is available for a text string. If you want to give your button name or identity this option is available for you.
Account page settings
Members can access and manage their own accounts as well as ask for support from here.
Support email address: Using the Portal interface, members can reach you for help with their accounts. By default, a no-reply email address is configured. You should set up a custom support email address so your members can contact you if they need assistance.
Portal links
You can use the Portal links section to add direct links to your site to open the Portal experience.
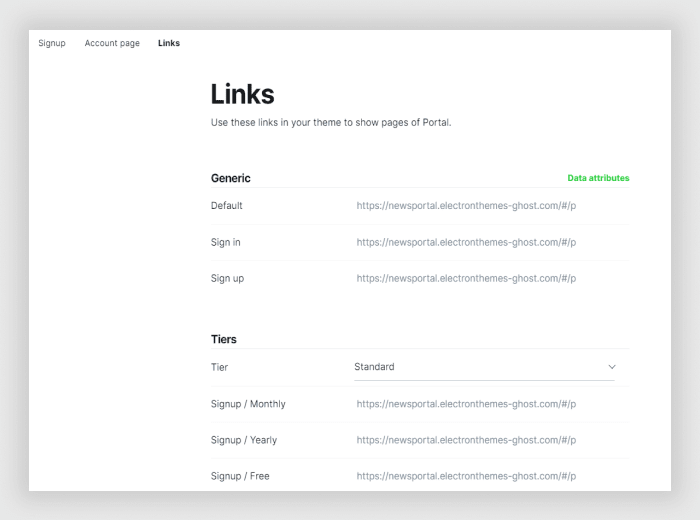
These links can be used in posts and pages. For example, adding a link to https://yourwebsite.com/#/portal anywhere on your site opens up the Portal window.
It can be added to a text link, turned into an image card, or added to a custom button in the editor to link directly to the Portal, or a specific tier for potential members.
Conclusion
Customizing the Portal settings in Ghost CMS is a great way to make it more tailored to your needs and the needs of your members. By following the steps in this blog post, you can easily customize the Portal.
FAQs
Do you have more questions about how to Customize Portal settings in Ghost CMS? We have answers to some frequently asked questions on the topic.
What are the different ways to customize the Portal button?
You can customize the Portal button by changing its style, icon, and text. The style options are Icon and text, Icon only, or Text only. If you choose a style that includes an icon, you can select from a library of icons or upload your own.
Why should I customize my Ghost CMS portal settings?
Customizing your portal settings allows you to create a unique and engaging experience for your website visitors. You can tailor the content, layout, and design to match your brand and engage your audience effectively.
How can I create custom Portal links?
Custom Portal links allow you to create direct links to specific sections of the Portal. This can be useful for creating links to specific membership plans or for promoting special offers.
